


 Select Store
 US
US
 UK
UK
Technique Tips Blogs
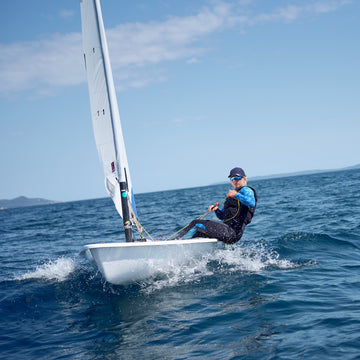
Steve Cockerill explains: 'Follow-on' ILCA Training
My favourite training routine for small to medium sized groups is a ‘Follow-On’.

Polilite® Mainsheet
Rooster's lucky break. In 1998 I gave Robert Scheidt (current world number one in the then laser class) a Polilite® 7mm mainsheet to test. He loved it but requested a lighter weight version for the expected light winds that Sydney would give. We then developed the 6mm version for him and Ben Ainslie. Polilite® went onto win all three medals at the 2000 Olympics. 6mm, 6mm, 7mm took the three spots on the podium then and has made it there many times since 2000. -Steve Cockerill (Rooster Founder & Chairman)
The History of Polilite®
They say that necessity is the mother of invention. In my case, I had been so upset by the way the mainsheets behaved on my Laser during the 1992-1996 Olympic cycle that I was keen to finally solve it. The concept was to produce a rope that was closer to 7mm than 6mm to help reduce the tangles and make it a little easier on the hands. I also wanted it to be lighter than a normal 6mm polyester rope and primarily, I wanted it to run out easily.
I figured that it was the properties of the inner core that made the rope more likely to tangle. His idea to solve the problem was considered by the rope manufacturer to be more revolutionary than evolutionary. I had the idea to put a low tech high stretch rope as the inner core of the rope. This would make the core lighter and leave the outer core to be the load bearer. The outer core would therefore also pinch the inner core under load - which would help maintain stability. I named it it Polilite® as it's a light weight polyester sheet.
Wash & Care Instructions
Wash before use:
Wash the Polilite® mainsheet in a washing machine on a cold cycle with a small amount of powder detergent.
This removes manufacturing oils that make the rope initially slippery but were used to increase body and reduce kinks.
Handling and coiling:
Always treat the rope with care.
Coil it climbing rope-style to prevent kinks and twists.
Alternate between left twist and right twist when coiling to maintain rope stability and protect the core.
Inspection and replacement:
Regularly check the outer core for wear, as it bears the load.
Replace the rope after 1 year of weekend use.
Rigging instructions:
Before rigging, ensure all coils and kinks are removed from the rope.
Once dead-ended in the boat, the rope won’t create or absorb kinks.
A good tip: throw the rope across the boat park and pull out twists before rigging.

Top 10 winging tips Theo Galyer
1.Make sure you start on bigger kit as this will make the start of the winging journey much less painful. For example, when deciding on a board to start your journey as a Beginner the sensible formula is Weight + 40L. So, if you are 80kg I would suggest getting at least a 120L board. As this will provide stability which is your friend. The second-hand market is massive, especially on Facebook groups as people are often downsizing kit as they progress
2.Always wear a helmet no matter your ability. The are some sharp and solid elements to the kit that are worth avoiding if possible. Make sure you are attached to both the board and wing, choose the combination that works for you. I like a waist leash. Booties and knee pads are also an essential at the beginning. Trust me I learnt the hard way and ended up with bleeding tops of toes and very sore knees. Over time you may be able to drop the boots and pads as you spend more time flying!
3.Watch out for other riders and obstacles. When you are a beginner I would hope people should give you space. Over time, you will go upwind and downwind covering big distance. Sometimes you have a loss of visibility so check to see if there is anyone downwind when you start riding the waves.
4.Stance is vital, most will have the urge to bend legs and arch back ideally stand tall, straight arms.
5.When starting out a solid breeze is your friend. I found as a 100kg rider a 20 knot consistent wind was the magic number to finally start getting first flights. It also meant going from kneeling to standing up I had something to pull myself up on. However 15 knots and above is ok especially for practicing taxiing but don’t expect miracles in this. On top of this you want to find a flat sea state if possible.
6.When you are starting to ‘Pump’ on to the foil you should point further downwind then you might initially think. Here is short but sweet tutorial; https://www.youtube.com/watch?v=oMuuOGBoASo. YouTube is your friend on this journey and there is so much out there to help progress.
7.I started using a harness to extend my sessions. It is a great hack/mod that can help give you longer sessions. When you have some ground to cover upwind it’s a life saver. It is worth considering as you start to progress.
8.Location is key, find a local spot where there are other riders. The community is super friendly and not only provide valuable tips. They could potentially spot you getting in trouble. If I am going out on my own or somewhere I might not be seen I carry a phone inside my wetsuit. Avoid offshore wind and strong currents. Dead onshore breeze can also be difficult as it is hard to get off a beach.
9.Don’t loose motivation. I assure you if you put the time in to winging it will give you a lot of joy in return. However, don’t be surprised if you spend at least 5 sessions flapping around and getting frustrated. Just remember to tell yourself that no session is a wasted one. I guarantee each time you will learn something.
10.Know your limits. It is a serious work out especially in the early days. Although it can be very tempting to keep going and going. It is vital you take breaks and know when to call it a day. I think the phrase is ‘live to fight another day’. Plus, there is only so much you can do in one session. Make sure you are having fun!

Gybing an RS400
Gybing an RS400
Gybing an RS400 can be trickier than some other dinghy classes due to its size, speed and the presence of wing-wangs (used to adjust the spinnaker pole angle).
This quick post summarizes our current method of heavy weather gybing along with a little video to demonstrate it.
1) Get the boat flat first! The crew loosely cleats the windward jib sheet before the maneuver begins.
2) The helm then uncleats the windward wing-wang and pulls the tiller toward themselves gently. The crew simultaneously moves weight into the boat whilst uncleating the leeward jib sheet.
3) At this stage the boom is beginning to travel across the boat. The helm begins to cross the deck and, en route, grabs the new wing wang with the mainsheet hand. The crew simultaneously begins pulling the spinnaker across (having the spinny sheets as short as possible can be useful here).
4) At this stage the boom has swung past the midpoint of the boat. The helm leaps out onto the toe straps and at the same time cleat the now windward wing-wang(tricky maneuver but mastered with practice). The crew also leaps out onto the toe straps and soon after begins adjustments to the jib and spinnaker. 5)The helm then swaps the tiller and sheet into the new hands. If the boat feel slightly overpowered here, the helm can simply steer the boat slightly back downwind to de-power it.
Overall this is quite tricky but practice makes perfect! Hopefully the video below will make everything clearer:

How to unzip your Rooster Digital downloads onto a Mac/OSX
Unzipping the Rooster Digital Downloaded zip file on a Macbook/OSX
You should have a web page & email like the below screen snap, when you have ordered your Rooster Boat Whisper Digital Download online:
Click on the download button.
It will then download a Zip file into the Downloads folder on your MacBook.
Then open your FINDER application on the Mac, and in the downloads folder, will be a file named (in this example): Rooster _BW_combo_set.zip (its a windows 10 zip file).
Now download and install the free App UNARCHIVER for the Mac found here : https://apps.apple.com/us/app/the-unarchiver/id425424353
Now, right mouse click on the download zip file and open with Unarchiver program. Click on Extract.
You then have a new folder in your downloads folder called: Rooster_BW_combo_set
In this folder you will find the Rooster Boat Whisper .MP4 files which when opened, will play with the Apple QuickTime player.
Enjoy...

Sail Winter and Pandemic Sailing Fitness Tips by Rachel Goetting
Rachel Goetting SailWinter and Pandemic Sailing Fitness Tips and Balance Trainingorcise LLC.
With winter just around the corner and the world still amid a global pandemic, how are you staying in sailing shape? Winter is a great time to put the fitness training in to boost your sailing performance on the water. Our simple tips will help you start or keep working out all winter long. You will also find a 15-minute Sailing Balance Training video. No equipment is needed for this training, making it an excellent workout while spending more time at home with the pandemic.Tip #1: Make a PlanIf you want to stick to working out, you need a plan! Without a plan, most likely, your new or present fitness training won’t last too long. You can sit down and schedule your daily, weekly, monthly, and yearly plan for your fitness training. Look at your week and schedule when, what, and where your fitness training will fit in that week. You also want to look at your outlook for the month and year to accomplish those fitness goals. Maybe buy a small calendar or use your phone to put in the times, routine, and where you will get in your fitness training. Having a plan will help you to start and stay with your fitness training! Start planning your week out today.Tip #2: Find Something You LoveNot everyone enjoys working out, but when you find something you love, it makes doing that fitness training a lot easier. There is a lot of different workouts I love doing, but I particularly love running. I love getting outside in the mornings and going for long runs. When I don’t have a lot of time, I know that running is a quick workout I can get in to stick to my fitness training. On the flip side, make sure you find something you love and do some things you don’t enjoy. This is going to help you reach your fitness goals. Find a workout you like and put it into your plan. This will help you to start and keep working out daily! You will even start looking forward to those workouts.Tip #3: Get OutsideRise and get outside! In my opinion, there is no better way to workout than out in nature. Yes, it might be cold, but it can be the best workout if you dress properly. Go for a run or add a simple 30-minute walk into your routine. Disconnect from technology and enjoy the cold weather. We love our outdoor workouts! Running, walking, hiking are great options for the winter. Also, if you have the opportunity, get to a ski mountain for some riding or skiing. I know we are hoping for lots of riding time at the mountain this winter! With certain restrictions getting outside might be more difficult, but find a way to get some fresh air each day.Tip #4: Set a GoalSetting goals in your daily life is so essential for success. The same goes for your fitness routine. You want to have daily, weekly, monthly, and yearly goals. Having these goals is what is going to increase your performance out on the water. These goals don’t have to be big; for example, a daily goal could be to complete 50 push-ups. You want to think about your fitness goals and make a point to accomplish them daily, weekly, monthly, and yearly. Accomplish those goals!!Tip #5: Push YourselfPush yourself each day! Some days are going to be easier than others, but find a way to push yourself. I know some days I wake up and really don’t want to get out of my warm bed to go outside in the cold. But I put my clothes out the day before, and that helps push myself. I always get back from the cold run or workout happier because I did it! If we push ourselves, we will get stronger each day. You got this! Keep pushing all winter long!Check out our 15-minute Sailing Balance Training video below. This is a great workout to help stabilise your muscles and build strength all winter long so you can make significant gains in your fitness for when you get back on the water. No equipment is required for this workout making it a great workout to do anywhere anytime!
Subscribe to our YouTube channel for more on fitness and nutrition for sailing!

Top Tips for Sailing Instructing
I have been teaching sailing for 9 years in total and I have really enjoyed my time I have spent instructing. I first received my RYA Assistant Instructor at my local sailing club, encouraging me to help out on start sailing course and improver sessions. I then achieved my RYA Dinghy Instructor after my five-day course learning the structure and basics of the RYA method. After six years of being a RYA Dinghy Instructor I signed up for my RYA Senior Instructor which I passed in April this year. I have taught at many different centres across the country including several trips abroad to teach at a centre in Europe. Instructing is a huge learning curve and you will only improve by experience, good and bad. It is okay to make mistakes as long as you are still in a safe environment. If you are new to instructing or have been instructing for years it is always useful to hear other experiences, so here are my top tips for instructing.
Sailing Area
It is really important to outline your sailing area before you launch your session. Tell your students exactly want you want them to do, especially if you are planning an activity which involves all the students together. For example if you are doing race starts you could get each student to sail a figure of eight around the start pin and another pinpoint, to keep them all together as the other boats are launching. Giving your students an aim helps to reduce the ‘starburst’ effect where all your students are sailing off in different directions. If there are multiple buoys or markers already in your sailing area, for example in the harbour, make it clear which marks. You can use crash helmets or old buoyancy aids attached to fixed markers to reduce confusion of which marks.
Teach at different centres
If you can, try to teach at as many different centres as you can. It is so valuable to be around different instructors in different conditions. I have learnt so much from watching and listening to other instructors, it is invaluable. There will always be a different set of hazards and hurdles to negotiate. It is also good to be able to try different boats and techniques to work out what really works for you as an instructor. You will also learn different ways of teaching subjects that can be difficult or not as exciting. Games are also useful to have to hand, to break up teaching and to have fun with your students. Both adults and children will benefit from games, just make sure you pitch to the right level.
Communication
Communicating with your students can be difficult when its windy or you have an engine close by. Think about where you position yourself, perhaps upwind and out of direct sunlight is most helpful. I have tried in my instructing to establish a loud voice without shouting, this may sound strange but communicating with someone who is scared or unsure will not be comforted by shouting. This is not an easy thing to do, teaching can test your patience, but your students will get a lot more out of your teaching with a good relationship. It is also good practice to talk to your students without sunglasses on. I make sure to establish whistle signals before going afloat.
A whistle signal with both hands above my head in a triangle is Go Home- all boats back to shore that’s the end of the session.
A whistle signal with both hands on top of my head is everyone to me- all boats get close to my RHIB and stop.
A whistle signal with one hand on my head and the other hand pointing to a boat is that boat to me
A whistle signal with me pointing to my engine is follow my RHIB- a useful technique from regrouping your students.
A whistle signal with my arm raising up and down, is slow down
This is no means a full list but using a few whistle signals can reduce the amount of shouting on the water and allows lots of boats to follow an instruction simultaneously.
Purchase some wetnotes
It is so useful to have some kind of waterproof notebook and pencil out on the water with you. If you are teaching large groups it can be useful to jot down the names of your students and what boats they are sailing. Knowing the names of your students from the start of the course creates a good relationship. Jotting down any feedback is good to refer to later in debriefs. Race coaching may require a larger notebook for race results, I prefer something small to have tucked inside my buoyancy aid.
Capsizing
There is a huge split here for teaching adults and kids. Adults will often be frightened of capsizing. Some fear comes from not knowing how the boat will react and some from fear of not being climb back into the boat once its upright. If your adults are particularly nervous, on a calm day in deep water be with them for there capsize drill, either close by in a RHIB or get into the water with them (Make sure your not leaving your RHIB unattended). They will greatly appreciate you coaching them through. Teach them the best way to climb back into the boat. If it’s a small dinghy then try and get them to the toestrap, on larger dinghies with high sides the transom can often be lower. Kids however after their first capsize will always want to be in the water capsizing, which can be quite disruptive to running a smooth session. If the weather is suitable tell your students when they are allowed to capsize from the off, I usually tell them the end of the day, one at a time in the last session to avoid unnecessary cold students all day.
Equipment
When you are using club boats its no secret that they will not be in the best condition. Sorting out rigging issues is frustrating in the middle of a session. Having small bits of ropes (Instructor String), a bobble and shackle in your buoyancy aid pocket will save you time and frustration. If you are able to spend some time before the students arrive or whilst another session is running, to check over the boats for any issues, it is always easier to sort problems out on shore rather than during your session. Also look at your main areas of teaching. On shore set up an area for your teaching. What resources might you need? I check to make sure I have access to a whiteboard and WORKING pens. Make sure the area is presentable for your students, having enough chairs and a clean non-sandy floor is always a good start. I thoroughly enjoy my time teaching and I hope this helps you with your instructing as we all need to learn from each other. Please feel free to email me at abi@roostersailing.com if you have any questions or queries for instructing.

Perfecting the RS400 Gybe - well nearly. (With an extra video)
Perfecting the RS400 Gybe in a 16 knots of Breeze. I plugged in my 'Speed Puck' get some numbers and help us focus on our training.....

Launching a Laser/ILCA on a Lee Shore
Lee Shore Launching in a Laser/ILCA - YouTube
Launching on a lee shore can be daunting but in a Laser/ILCA it’s relatively easy.
I tend to only attach my mainsheet once I am near the water, to avoid taking out other peoples’ tiller extensions, trollies and dogs with my Laser Mainsheet.
With large waves, the hard part is trying to hold the bow into the wind and waves. Once you have your daggerboard down, you can use it as a pivot, pushing the transom the way you need to, ensuring that the sails remain head to wind. Then you can take your fully down rudder and stock, that you had left tucked under the traveller line for safety and attach it to your pintles and you are off. The video was the only one I had and shows a man giving me a hand with my trolley. The rest was easy.

Extreme Weather Sailing – Practice the San Francisco Roll
San Francisco Roll - YouTube
After experiencing the 2005 Tyne Tees Laser Qualifier where the UK Laser Standard, Radial and 4.7 fleets found themselves in 54 knots of offshore breeze I felt I should write a short article about some of the top tips I have learned over the years which perhaps we should all be familiar with when conditions get a little out of control for our experience.
I learned my first tip from Mark Littlejohn during my first serious winter sailing the Laser in 1993. We found ourselves in a race with winds occasionally gusting 35+ knots at Chichester Yacht Club Snowflake Series. I was new to the Laser – and found myself using increasing amounts of kicker and Cunningham as the wind increased until I could not pull anymore on! I was sailing upwind with my boom out beyond 1.5m from the corner of the boat – but the boat was uncontrollable, jumping and lurching in each gust. As it became increasingly gusty, I could barely control the power or weather helm. I found myself either stalling head to wind or capsizing in the biggest gusts. Mark seemed to be coping much better than I was. He told me after the race that he had released the kicker and sailed with the boom high in the air. This technique massively reduces your pointing ability, but you can sail confidently without taking a swim.
Technical bit – when you release the kicker and let the boom rise, the mast straightens which takes the fullness (and power) forward; the sail gets fuller and the leach opens. The leach opening reduces the power and the fullness moving forward makes the boat more balanced on the helm. What you feel – you cannot point as high, but the helm is more neutral and the power has mostly evened out. The result– a ‘get you home’ setting in 35+ knots. Remember – the boom is sheeted out – and the sail flaps a lot!!
The second tip I sadly learned myself. I was sailing a Europe at Draycote Water Sailing Club. It was not even a particularly windy day, but I had capsized. Perhaps due to the lightness of the hull and the height, it floated out of the water or perhaps I was just too slow to pull the boat up; but by the time I found myself on the daggerboard, the rig was to windward. Simple you might think – just jump in and cross the boat quickly and stop it capsizing on top of me. Unfortunately, the wind got underneath the sail as the boat came up and it threw the boat at me so quickly that I ended up with 6 stitches. I had heard of a something called the ‘San Francisco roll’, where the sailor hangs onto the centreboard and goes underneath the boat, but never seen it performed, nor had I fancied trying it out. From that day forward I made myself try it out the next time I had the chance, purely from a safety point of view. Don’t think that because you have not tried this that you are less of a person, but I strongly advise you try it so you can add it to your tool kit.
In more challenging conditions that you might experience in the Solent, you can have the wind blowing the hull downwind and the current taking the rig upwind. There may be no other way to pull the boat up with the sails downwind of the hull. So if you have found yourself miraculously making it through the boat without injuring yourself, to the centreboard on the other side and found the only way to pull it up is to use the windage on the hull, then you will have wished that you had learned this technique when the water was warmer, because, with this technique, you CAN get the flappy thing back in the air.
It was much later that I discovered how dangerous sailing can be if you are not equipped with the San Francisco roll. I was the Officer in Charge at a sailing centre in Portsmouth harbour when I let a qualified sailor with his level 3 RYA certificate out on the water in a Laser, after all, he was more qualified than me. On this occasion, the wind increased dramatically for a period and I saw him capsize about 6 times in quick succession. I likened it to a washing machine. He had capsized, turtled. He pulled the boat up and then the wind capsized the boat on top of him. By the time he had scrambled onto the centreboard, the boat was halfway up again and yes it went right over again, and again and again! Poor chap, when we got to rescue him, he was completely knackered! He had never heard of a San Francisco roll.
When you practice this technique for the first time, try and find a competent person to hold the bow 90 degrees to the wind to ensure the boat will flip. Its also super reassuring that they are there.
The last strange safety feature when sailing a Laser – is to wet and dry the centreboard from new. If you don’t, you may find the board too waxy to hang onto when you are it in the water. Be aware that there are rules to modifications to the centreboard, but so long as you are just removing the waxy finish you should be legal and safe.

Hiking Styles - The Secrets Behind Efficient and Healthy Hiking
In this blog Steve discusses some of the typical problems associated with hiking out and takes advice from Fiona Taylor, a physiotherapist who has often been found in dark corners of Sailing Clubs, at Laser 4000 regattas, with strange men and women complaining of aches and pains. Check out this video - but do read the rest of the blog - there are some great tips.
The main area of concern for us is our knees. Bad knee pain affects most of us throughout our sailing careers and can often be the reason for changing to more pedestrian classes sooner than we would like.
In the majority of cases, the source of knee pain is from behind/under the kneecap (patella). This joint is particularly vulnerable in sailors because of the loads placed on the joint in the hiking position and the joint shape that relies on specific muscle activity.
I have seen many young sailors using bad and ineffective hiking styles that will, if not corrected, store up problems for them in later life. I am afraid it is a subject that if we do not take seriously can lead to bar talk like; ‘I couldn't carry on sailing a single–hander because my knees gave out.’
Having had an aggravated knee problem myself, I have been keen to write this article for some time to ensure that we all develop good, healthy and effective hiking styles so that we can enjoy this physical aspect of our sport for many years to come. Fortunately for me, I have changed my techniques, which have in turn helped repair my knee, and as a bonus improved my speed.
I was diagnosed with chondromalacia patella some 30 years ago. This condition is common among all types of athletes. It basically means that I had an imbalance in the muscle groups around the knee that in my case was caused by a bad hiking style. This bad style caused the muscles to develop in an unbalanced way which caused the knee cap to move out of track and become inflamed and very painful. When I got tired I had a natural leaning forward style which involved rotating my aft foot forward and using the stronger and more stamina resistant outer quadriceps to maintain the hiking position.
Obviously, when we exercise we are going to develop our muscles, but bad exercises can allow the outer quad to quickly become the dominant muscle and allow it to pull the kneecap to the lateral or outer side. The critical aspect of the muscles around the knee cap is their balance around the joint. The key muscle in the balance and stability of the knee, and yet the hardest to develop and maintain, is the inner quadriceps. This muscle requires much harder work to develop and maintain but it ensures the balance between the large small angled pull of the outer quadriceps and the small large angled pull of the inner quadriceps.
In serious cases, the only course of action is to purposefully damage the lateral muscle (lateral release) in order for the other muscles to regain the upper hand in the control of the kneecap. The other alternatives are to take rest and anti-inflammatory drugs, which make the pain go away but leaves the knee prone to further damage or exercise in specific ways to encourage the inner quad to develop and reintroduce the balance around the knee cap. Thankfully my case was not too bad, so specific exercises was the key. I spent 6 months with a piece of elastic looped over the end of my foot and around a table leg. I had to pull my right foot against the elastic toward my left foot, with a twisting motion. It caused a few strange looks from my workmates but this re-educated my inner quadriceps to take control! When sailing, I had to concentrate to keep my feet pointing outwards, making the inner quad do more of the straight leg control. This was not easy! When riding my bike for exercise, I ensured my saddle height was high enough to allow for the almost straightening of my leg at the bottom of each revolution. Not the traditional – can you place your feet on the floor? I avoided the deep squats when weight training in favour of almost straight leg quad exercises. Deep squats and bent leg cycling encourage the development of the outer over dominant quad – not what was required. The amazing thing about the correct hiking position is that it is good for knees. Straight leg hiking provides minimal pressure on the kneecap and encourages a balanced use and development of both the inner, outer and middle quadriceps.
Below you can see Straight Leg Hiking
Here you can see Bent Leg Hiking. Notice how holding on with the toes drops the bum closer to the water.
Bent leg hiking causes large pressure on the kneecap. Research has shown that when the knee is fully straight the load placed on the patella is minimal. However, if the knee is bent 30 degrees twice the body weight is exerted on the joint and at 60 degrees the load exceeds ten times the body weight.
Information is taken from Fiona Taylor's degree project (probably better known as Fiona Bullmore to many Cadet, 420, Europe and Laser 4000 sailors).
Bent knee hiking encourages the over the development of the larger outer quadriceps – which in turn leads to it's over dominance and our friend, chondromalacia patella or bad tracking of the patella taking hold. Bent knee hiking also has a tendency to encourage the side ways on hiking styles that continue to aggravate the problem. In addition, bent leg hiking causes more pressure on the foot, which takes not only the weight of the sailor but the lever effect of the bum drooping style.
I would hate to consider the added pressure on the foot joint with bent knee hiking – perhaps this could be the subject of some future research.
Many significant changes in hiking style have occurred in the Laser class over the years. One of the most significant changes being introduced by Nik Burfoot, (ex-world Laser Champion from New Zealand). I saw Nik pointing his toes with very tight toe straps in his Laser at a Regatta in 1994. Under questioning, his explanation was; ‘if the leg is straight then there is no need to hold the toe up to grip the boat. In fact, holding the foot up only makes the hamstrings work against the quadriceps, which are trying to keep the leg straight.’ It sounded feasible so I tried it for myself and progressively shortened my toe–straps to good success.
Try this quick exercise for yourself; Hold your leg out in front of you off the floor and point your toes in line with the straight leg. Then try and pull your foot up to the normal toe–strap holding position - does your knee want to bend? In pulling your foot to the angled position, your hamstrings have been tightened and thus cause the knee to bend, which relieves the stretch on the hamstrings.
Keeping the hamstrings well stretched is common advice given by physiotherapists and would also help maintain the straight leg with angled feet. However, straight leg hiking with pointing feet/toes take less strain on the foot joint, the kneecap and your quads and relieves the tightening on the hamstrings. In addition, this style also requires the toe–straps to be tighter which helps the sailor to grip the side of the boat. The more in contact a single-handed sailor is – the more small body movements can effectively be transmitted to the mast and depower the rig. It follows that to use this style, the toe–straps anchoring point needs to be as close to the hiking point as possible so that the foot is not encouraged to 'hang on' to the toe–strap but merely is held by the toe strap. Unfortunately for Nik Burfoot, he gave his advice freely to his teammate, Hamish Pepper, who also took it to heart and subsequently beat Nik at the New Zealand Olympic Trials in 1996.
Rooster has developed a range of Padded Toestraps that have significant grip when used in conjunction with our hiking boots which is ideal for pointed toe hiking. Our range of hiking boots have been designed to give the wearer the confidence to point your toes, by increasing the stability of the boot by reducing the stretch between the heel and bridge, which in turn will stop if falling off your foot if you point your toes. Imagine, a 55 year old winning the Aero 7 World Championships - well I think it was my Pro Laced Boots which helped me win. Alternatively, you might like a Low Cut Boot which is also super stable, I used to win the RS300 Inland Championships in 2019. You just might like to add some wet socks to give you that shin protection. Even our All Purpose Boot has had some clever design work to reduce the stretch between the heel and the upper foot (instep) whilst we have angled the zip to make it easy to put the boot on, so you can still benefit from an easy fitting boot that remains secure when hiking or trapezing.
Save Save Save Save

Tacking - The Technical Stuff
I learnt to sail on an old gravel pit in the Midlands in the UK. Just to make it more interesting, Tamworth Sailing Club also had islands and trees. These features created some rather interesting wind shifts that were worth using so I quickly learned the importance of tacking efficiently. Later when team racing with Aston University’s BUSA winning team, it became clear that tacking well made you a tactical genius.
I think I have probably taught more crews to tack, than I care to remember. Team Racing in the Royal Navy with a regular crew meant finding a keen youngster, teaching him/her how to tack, then finding that they were posted back to sea just as the team work had been perfected. To help me and the new, already shell-shocked crew through the difficult settling in period, I found that going back to first principles was the best place to start.
The philosophy of tacking which we would commonly go over would put the basics into perspective. These principles work for single handed or double handed dinghies.
Tacking Philosophy:
1st Principle: That the speed of the craft prior to the tack should be converted into distance to windward. Commonly I see people trying to get their boat to the other tack as quickly as possible with no consideration for cheating the wind.
2nd principle: The rudder should follow the turn set up by the weight distribution, movement and the sail trim, rather than induce it. Less rudder action means less speed reduction into the tack.
3rd Principle: That any acceleration induced by the final pull up should be at the optimum rate to give maximum speed. You may find some boats are so stable that they correct themselves too quickly; these boats require some active counter weight techniques to slow the pull up of the boat. I think of the 2000 as an example of this type of boat, especially with its smaller mast length and sail plan.
These principles are perhaps obvious, but with a little more investigation and application of some basic scientific principles, we can develop the reasons behind why some can tack more efficiently with what seems less effort.
I will be breaking down the tack itself into easily determinable key stages:
The Luff to Head To Wind
The Pump to Windward
The Sail Trim
The Pull Up
At each stage I will be considering angular momentum, apparent wind, the rudder and sail trim. However, I have not limited the discussion to any craft in any breeze condition.
Let's take the first part of the tack for example:
Since we are not allowed to come out of the tack faster than we go in, there must be a way of reducing the losses caused by the slowing of the boat into the tack. Commonly we are tacking because of a shift that allows us to sail closer to the ideal direction of the next mark. However, if the tack is not efficient then often we find that it might be as well to carry on to the layline for the mark. The key to the efficiency of the tack is in the first stage. When coaching a group of sailors, Chris Gowers' used a great vector diagram to show how important this part of the tack was. If we can turn to head to wind without losing speed, then we are 1.4 times faster than on the tack. This is because if we draw a vector line representing our speed on a tack - then swing it to head to wind - then the head to wind line is 1.4 times larger in the direction of the wind than the vector on the tack. So it's this part of the tack that I try to use to pinch something back from the potential loss by tacking.
Phase 1 - The luff to head to wind.
This part of the tack should not be a push with the rudder. In fact it could be said that the rudder plays no part in the tack at all, but it is probably used to control the rate of turn rather than induce the turn. If the boat is at maximum speed prior to the tack, the feel on the rudder should be neutral. Now to begin our tack, we must not repeat not push the rudder!!!!! Try to relax your grip on the extension - let it follow you rather than you steer it. (A good Laser/ILCA Rooster Carbon Tiller Extension should help as they are super grippy anyway). So how do we get the boat to begin the tack? Simply over trim the main sheet slightly, under sheet the jib slightly and if needed, a tiny, repeat tiny bit of leeward heel. The centre of effort of the sails will then have moved back behind the hulls pivot point and the boat will naturally want to begin to luff to windward - let your rudder follow it. Don't get too excited and want to move just yet. Be patient.
As the boat progressively sails closer and closer to the wind there are more things to consider:
If the helm and crew are not conscious of the balance of the boat it will begin to heel to windward very soon, which if not corrected, will be trying to send the boat back away from the wind. A common mistake is to start your roll to windward too soon. Doing this would require the use of more rudder to keep the turn going (which would slow you down), due to the natural shape of the boat trying to turn the boat away from the wind. So ensure you are actively trying to help the boat round towards the wind by reducing your leverage if required.
Assuming the boat is steadily turning to windward, then the bow of the boat will experience a continual lift due to the new turning apparent wind. This turning lift is often overlooked and is a real helping hand in sailing to head to wind. You may have noticed that sometimes when you tack the tell tails tell you there is a lift just as you start to tack. This is the turning wind.
When finally you get to head to wind, the jib or luff will back. On a single hander such as the laser - I call the jib the portion of the sail in front of the window.
Phase 2 then starts.
If you followed phase 1 correctly, then the boat will still be almost upright and the crews weight will be further in the boat than the norm for the conditions and the main should be in tight.
A quick technical thingy we will consider in this phase of the tack is angular momentum. Without going into the physics of it, just think about how an ice dancer speeds up a turn on the spot by pulling his/her arms into her body (or the center of the point of the turn).
The centre of this point in a boat when tacking is over your shoulder, somewhere about 90 degrees to your boats direction. If the weight in the boat were to move to the centre of the turning point to the old windward deck, then the speed of the turn will speed up. However, if the crew move to the centre of the turning point before the boat has began to turn, then nothing happens. This is why we should wait for the boat to start its turning to head to wind before we make our move to the centre of the circle. Thankfully if we have carried out stage 1 of this tack correctly, then the angular momentum part of stage 2 will work even better. Remember the sailors have moved their weight into the boat as the boat headed up. This has actually increased angular momentum and has stored up loads of it ready for the reduction in stage 2.
Sorry about that bit but here we are back thinking about stage 2 of the tack. Stage 2 begins when the jib backs, or for single-handed sailors, when the first third of the sail backs. I really do mean backs rather than lifts! Now a pump to windward does a number of things:
The angular momentum is reduced and so the boat spins around the sailor.
The pump to windward at this stage means that only the main or back 2/3rds of the sail pulls in the pump to windward, which again turns the boat effectively. Note, the mainsail should be in tight at this stage to increase leach tension to help this effect.
As there is less sail filling in this part of the turn, the pump to windward is made easier, with less effort by the sailors.
All this adds up to little requirement for the use of the rudder to complete the turn, which is of course the one thing that if used would be a break, slowing the boat down. You may see the rudder used in both pictures and the video on the Boat Whisperer Upwind DVD/Download product - so I should say that the rudder is not being positively pushed but that it is actively following where the boat wants to go.
Phase 3 is the move across the boat to pull it back to flat giving it the required acceleration on the new tack.
Now for those of you who are feeling a little vulnerable thinking about the heel to windward and the problems of crossing the boat to get it flat before you fall in, read through this little parable. I heard it first told by Cathy Foster (1st lady 470 Olympian when sailing against men) :
One no wind day, Cathy gave a class of youth sailors a little game. The task was to move underneath a table from one side to the other in the quickest time. The only rule was the table top had to remain above the legs. Remarkably it did not take the competitive youngsters to realise that if they turned the table onto 2 legs, then they could stand up to move under the table rather than crawl across which had hurt their knees. Another was sharp enough to see the reason behind the exercise, which was to show them that a heeled boat makes it easier to move under the boom quickly than a flat boat.
I'm never sure if this parable is really true, but the concept is, if the boat is heeled then it saves sore knees and bent backs.
To add extra heel to the boat before the sailors move, the sails should be sheeted in. Commonly I used to say to the crew to sheet in the jib on the new tack before we both crossed the boat together. If the boat is pulled up before both sails are set, then all that happens is the main is the only one pulling correctly as the jib is simply blown across the boat. This is not quick!
Sheeting in also helps the extra heel in light winds. If you don’t sheet in at this stage the boat will naturally come upright too fast with little or no acceleration. In a Laser I use my aft hand to grip and pull the deck to me - rather than take me to the deck. This adds some extra heel. In many two man boats I try and find a toestrap or something to haul the boat over as I cross the boat. Now the one problem with sailing many different boats is adapting to the different stability of the hull/rig. Some boats are super stable and require lots more energy to get them to heel at all. Others only need the slightest movement to induce a large heel.
The movement from the leeward part of the boat to the new windward side will also help the boat heel yet a little more, good old fashioned action and reaction for those of you who remember your physics lessons.
Now the final Stage -4: The pulling up, acceleration bit.
Remember, the boat has been heeled by the combination of the first pump at the start of the tack, together with the sails trimmed in and the reaction of the crew moving.
The rate of the turn of the boat will also be reduced by the crew moving back across the boat (increasing angular momentum, or ice dancer moving her arms out). This should reduce the requirement for the rudder to stop the rate of turn.
Lets consider the new apparent wind on the sails in the pull up. As you can imagine, the new apparent wind will be a large lift on both sails. Commonly I try to ease the sails slightly to help the new apparent wind work effectively on the sails rather than stall them.
This pull up process has an optimum rate - too long and the boat slips sideways, too short and the boat does not have time to accelerate. The easing of the sails and the movement of the crew regulate the speed of the pull up.
The last and final stage of the tack is the sailing on the tack bit. As the speed reaches maximum, the sails are sheeted in hard to compensate for the increased and slightly headed relative breeze now you are at full speed at the end of the tack.
We must ensure that we move back into the boat in time, to prevent the boat from going past the upright position; this would result in the rudder being pushed to keep the boat on course. The heavier the rig is, the more the crew have got to move back into the boat to counteract the weight of the rig continuing over to windward.
When I am trying to help others to improve their roll tacks, I like to show them how stable their boat actually is. I encourage them to remain in the pre pulling up position for as long as possible. I also think it is a good idea to gain an understanding of the balance point of the boat. For example, the Laser's balance point is quite different for a 4.7, Radial, Standard. Actually I am not sure that I have ever managed to find the balance point in a 4.7 in light winds as the rig is just not heavy or long enough to help tip the boat without help from wind.
You may also like to seriously slow the tack down to show you how stable the boat is. Do not cross until the boat is heeled enough.
And now a normal speed tack. (Note how much sail is backing before I move to the centre of the circle)
Here in light winds but also more waves:
Now with more waves and more wind - it becomes harder to give the boat as much roll to windward as you might like. In this instance I start to give the boat an impulse.
Lastly a repeat of the first tack in a Scorpion. I guess I was proud of this one as there is so little wind. I love the way the wind in the slot blows Sarah's hair at the end of the tack.
If you have problems tacking or want to improve, please send me a link to your tacks on YouTube and I can give you a critique. I'll try to be honest and constructive. What have you got to loose??
Steve


